Thursday, March 9, 2017

Growing Veggies and Composting


I started 'gardening' in the balcony by accident. I don't know if you can call planting a few stuff without much thinking gardening.  Anyway, I saw this organic bak choy at Metro (a cash n' carry that usually has Asian stuff) bought it - then found that it comes with roots!

So I tried to replant the bak choy in a jar and at the same I had some spring onions so I thought I will replant them too. I gave them water but didn't pay too much attention to them as I had classes. But after a week I noticed that the bak choy had grown new leaves and the spring onions are also sprouting new greens.


the veggies section at Metro


the new green sprouting giving me happiness
I must admit, I don't have a green thumb. I don't know the rules and the hows and whys of gardening. And I hate reading manuals and instructions. That's why I got excited when I just put these two veggies in the soil and they started growing. And another thing that has been on my mind is composting my food waste. I use a lot of coffee, eggs, onions, garlics, tomatoes..to name a few stuff which are constantly in the kitchen. And I have been throwing them in the trash for the past year or so. (Eeks, why didn't I start doing this earlier?)

Actually a year ago I was deciding between growing a plant or having a pet. I decided to get a pet and of course having a plant was out of the question because I didn't even know how to handle a cat at the time. But now, I'm used to living with my cat and although he is very curious and active - he has broken a few glasses and plates because he ran like the Flash and jumped about - at least I know how to handle him.

So now I have a new project, to plant vegetables in my balcony! Haha.

Took this black plastic box from outside the market and bought two packets of soil

I don't even know if I'm doing it right, I put my bak choy there, my spring onions there, and also i'm trying to germinate some chilli seeds by just throwing them there *cross fingers*
And I have to cover with another plastic box because of this curious little boy

So I'm now trying to grow garlic and mint. Let's see if they will happen too or not. I guess I keep thinking of new things to grow. I must say, there's something nice about growing plants. When you see that new green sprouting, it feels like ahh satisfaction. Like you have something to look forward to. Or maybe I just want distractions from studying :p

I think garlic is on the right track

I'm hoping that those two are my chillies

About the composting, I am still not 100% sure. I have started it, but I think I want to give it up. Hmm.. Do leave a comment if you have any tips for composting or gardening!

Thank you for reading my blog :)

Tuesday, February 21, 2017

English Muffins!


When I was younger, I used to spend school holidays with my aunt in Singapore. She would buy this pack of English muffins and we would have them for breakfast - toasted with butter and jam. I now crave that kind of muffins - soft, a bit chewy and go really great with jam. There is this similar kind of bread in Turkey called bazlama and it looks exactly like English muffins but the taste is not quite there.

So of course when my mind is made up that I want to try and make something, I will search the internet to see whether it is viable to make (I checked croissant recipe and decided that it's too difficult). I watched some YouTube videos and read some blogs, and they all have different ways and variation of ingredients. Some use eggs, some don't, some use milk, some use water, etc. Some knead and use a cutter, some don't knead and just let it sit overnight.

So in the end I decided to try the overproofing method, where you leave the slighty liquidy sticky dough overnight to fully rise and then fall, to create the 'nooks and crannies' as they call it when you split the muffin in half.

At first I tried using this recipe. But I kind of buat pandai and used 1 cup of white flour and 1 cup of whole wheat flour instead of 2 cups of white flour as stated in the recipe. Somehow my muffins had this overpowering yeast smell and slightly bitter.

from the first recipe

they look okay, but I didn't like the taste

I considered my first batch as a failure. I never had much luck in bread-making and anything to do with dough, but at this point I have already become obsessed with making the right English muffins. I checked for another recipe and stumbled upon this blog (https://delishably.com/baked-goods/Homemade-English-Muffins). I decided to try again with her ingredients but with the first recipe's methods. And this time I didn't add whole wheat flour - just normal all purpose flour. They turned out great. I am so happy and because they are so easy to make, I don't mind doing them again :)

This is how I made them :

Ingredients : 

  • 1 & 1/4 cup fresh milk
  • 1 Tablespoon sugar (brown or white)
  • 1/2 teaspoon salt
  • 2 cups plus 2 Tablespoons white flour
  • 1 Tablespoon plain yogurt
  • 1 Tablespoon unsalted butter, melted
  • 2 teaspoon yeast 
  • Semolina or cornmeal, for sprinkling


Method :
  • Heat milk to a simmer, add butter and sugar
  • Transfer to a mixing bowl, when the milk becomes lukewarm add yeast. Wait 10 mins to activate the yeast.
  • In the meantime measure the flour and add salt.
  • Put yoghurt into the milk mixture and add the flour. Beat the mixture with a spatula or hand mixture. The dough should be sticky. Cover with plastic wrap and leave overnight to overproof it (it will rise and fall).
  • The next morning, scrape the dough and give it a bit of a mix. sprinkle some semolina or corn flour on a tray. Scoop out the dough and place on the tray and sprinkle some semolina on top of the dough too.
  • I find that waiting for the dough to rise for 30 minutes will give it a nicer shape before cooking them on an ungreased skillet on the stove using small heat. Let the muffin cook on the skillet slowly, about 8 minutes each side. Afterwards you can also put into 175 degree Celsius oven for 5 minutes to finish it up. Wait for them to cool down, split them open with a fork and enjoy!
Lukewarm milk, butter, sugar and activated yeast

mix the flour, salt and yoghurt and cover with plastic wrap. the dough will be sticky. let it rise overnight

the next morning. it has risen and collapsed. 
scrape the dough and mix a little
sprinkle semolina on a tray and scoop out the dough

cook on low heat and ungreased skillet
let them cook slowly, flip them when brown, careful not to burn them
Let them cool before splitting them open, but if you can't wait it's totally up to you 
the 'nooks and crannies'

yum, Afiyet Olsun

Monday, February 20, 2017

Leek in Olive Oil - Zeytinyagli Pirasa


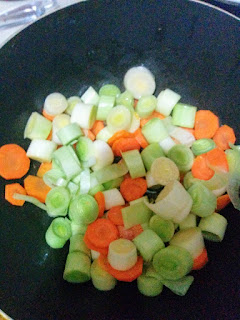
One of the easiest Turkish meals that does not need tomato paste (usually evident in most of their recipes) is Zeytinyagli Pirasa (Leek in Olive Oil). It is a sort of a one-pot meal, easy and healthy. I tweaked it to suit my Asian taste, as we like to have more rice because it is our staple, but normally the rice should be lesser.

The ingredients are just leeks, carrots, olive oil, rice, lemon and some sugar and salt. That's it.

  • 6 leeks - chopped thickly, about 1 inch
  • 2 medium carrots - slice thinly
  • 6 tbsp olive oil
  • 1 lemon - to be squeezed
  • 1 tsp sugar
  • 1/2 tsp salt
  • 2 tbsp rice (but in the picture below I used 1 turkish tea glass of rice)
  • 2 glasses of water


First, heat up the olive oil on medium fire. Then add in the sliced carrots, give a bit of a stir and cover for a few minutes. Then add in the chopped leeks, stir for about one minute. Add the rice, sugar, salt, squeezed lemon juice, and water. Give a bit more stir and cover, keeping the fire on medium. Then let it cook for about 20 to 25 minutes. Let it cool before eating and enjoy!

My first try - I was a bit stingy with the olive oil 
I also put a lottt of rice :D

To each its own! I like it with a lot of rice but do try whichever you like.

Monday, February 13, 2017

My short adventure with claypot cooking : claypot seasoning failure


I bought an unglazed claypot a few months back as it was on offer at A101. I was excited at the prospect of using it for claypot noodles, chilli beans, claypot rice and etc. But I did not really know how to use it. I googled and watched YouTube videos on how to 'season' or cure it before using it for the first time. There were several different ways to do it but I opted with the one that says rub garlic cloves all over the pot, then rub margarine or olive oil, fill it with water and put in the oven (not a preheated oven as the sudden heat can crack the pot) at 200 degrees celcius for two hours.
And every time before using the pot I will have to fill it with water and wait for 15 minutes, to not put it on high fire and to not wash it with detergent as the pot is porous. Oh, a lot of work for a pot isn't it? 

I somehow managed to screw it up. The first time I used it, I made lamb stew. Apparently that was my first mistake. I saw on a cooking group in Facebook that Turkish moms/grandmas will only cook veggie based food for the first 4 or 5 times to properly seal the pot before putting meat. And I saw on some Indian cooking website that they will first cook rice in the pot. 

After the second usage I noticed a long crack at the side of the pot running to the bottom. So I searched the net again, they said I can reseal with a bit of wet flour. I did that and yes the crack was covered and the pot was no longer leaking. That was when I used it for the third time, to make claypot egg noodles. There was a slight different smell coming from the food, but I just brushed it off as 'earthen smell'. I enjoyed my claypot egg noodles, my stomach was a bit uneasy after that, but I am usually lactose intolerant anyway so I didn't think anything much about it.
Yup this was my claypot egg noodles in the making

Ignorance is bliss

So only the fourth time of using the claypot, it unleashed the KRAKEN. Yup, it attacked me to a 3 day diarrhea and vomiting and stomach cramps. The worst I have ever had. I had to sleep with plastic diapers because the diarrhea just kept coming without me realizing. But I didn't know that the pot was the culprit! That day I had made chicken soup in the pot, and used the soup to make chicken rice, and had another helping the next day when I reheated them. When I got the food poisoning, I thought it was because I mishandled the chicken - thought I defrosted and refreezed them and bacteria formed. But nooo...

I only realized the pot was the culprit when I made chilli beans. I was excited as usual, I bought kidney beans, ground beef, checked the recipe and cooked it. But it was at night so I didn't eat it straightaway and decided to eat the next morning. It was winter in Turkey and there is no heater in the kitchen so I didn't bother putting it in the fridge. The kitchen itself was as cold as the fridge. But when I wanted to reheat the beans the next morning, I saw weird bubbles forming all around the beans. It was not normal at all. It definitely seemed like something was wrong. But I had to get confirmation, so I sent a photo to my family group and asked my mom. My sisters were like THROW IT AWAYYYY!! But I was still in denial, see. I have been craving kidney beans and ground beef. But after a while I accepted the fact - bubbles means bacteria has formed in the food. No other reason. I have to throw it out. When my mom said claypots are porous, it hit me - the POT CAUSED MY FOOD POISONING! So lesson learnt - I won't be using unglazed claypot for a while now, until I get over my trauma. Or I will buy the Japanese donabe pot, one day.

If you want to see the bubbles in my chilli beans, scroll down....NSFL


Eeeee....


TurkAsia Template by Ipietoon Cute Blog Design